Always With Me, Always With You by Joe Satriani Song Analysis
Always with me, always with you by Joe Satriani is a classic instrumental song that showcases a lot of great ideas and music concepts. It’s a great song to analyze from a music theory point of view because you’ll be able to take a lot of simple ideas and use them in your own music.
Compared to other songs by Joe Satriani, this song is quite easy to play. The simple structure and slow pace is a good way for intermediate guitarists to start experimenting with improvising.
In this article, I will give a basic analysis of the song and how you can take the music theory ideas and apply them to your own playing.
Song Structure
If we ignore the lead guitar, the structure of this song is simple. It follows an A B A structure. We start with one progression (the ‘A’ section), move over to a different progression in the middle of the song (the ‘B’ section), then return to the ‘A’ progression.
Here’s the entire song mapped out to the A B A structure:

The first A section lasts for 48 bars before moving on to the B section. The B section is only a small part of the song at 22 bars before moving back to the A section for the rest of the song (around 72 bars).
If you compare this to a typical verse-chorus pop/rock song, it’s an incredibly simple structure. While it might feel limiting to have such a simple structure in a song, it can give you more freedom. As you will see later, the simplicity of the chord progressions and the structure means you have a lot of freedom to improve over this track.
‘A’ Section Chord Progression
While most guitarists’ attention goes straight to the lead guitar, let’s look at the rhythm parts first. The rhythm parts are the backbone of the song and there’s a lot we can learn here. If you want to understand what makes this song sound so interesting, spend some time looking at the rhythm parts.
Here is the main chord progression in the A section:
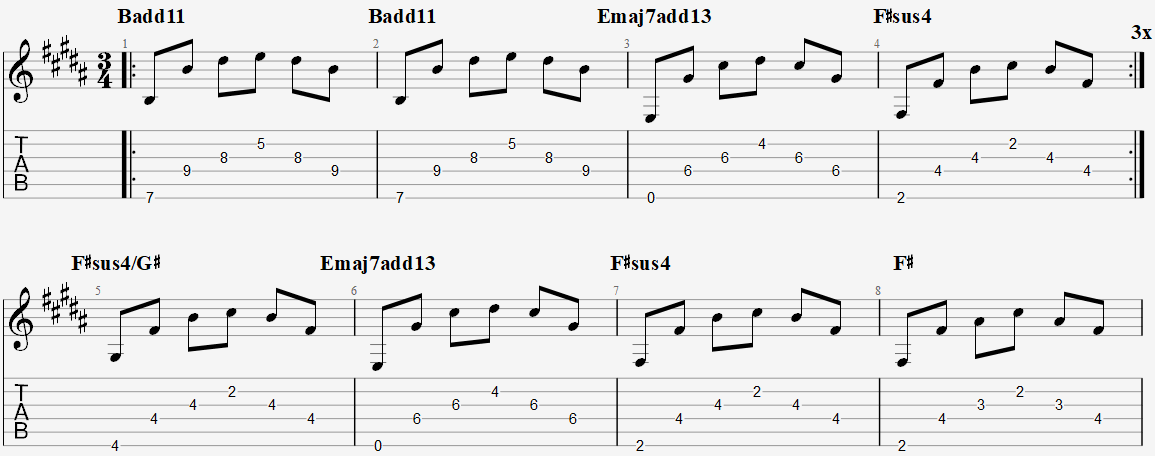
This is the first guitar part you hear and it sets the vibe for the entire song. The above chords are all in the key of B which means the above chords fit in the B Major scale. We’ll look a bit closer at this later.
There are a few things that make this progression interesting compared to a ‘typical’ chord progression:
3/4 time
The majority of music is in 4/4 time (four beats per bar). This song is in 3/4 time. While there are a lot of songs in 3/4 time, it’s uncommon enough for it to stand out when we’re all so used to hearing 4/4 music.
In your own music, if you feel stuck in a rut, try coming up with something in 3/4 time. You’ll find it’s enough to change the way you think and the way you play.
Extended chords
The first thing you might notice with the above progression is that there are no basic Major or minor chords you tend to see in songs like this. If you’re a beginner you might have seen the name ‘Emaj7add13’ and freaked out. But these are still very basic chords when we break them down.
Let’s break down the chords and look how they all fit into the key of B Major:

This is a useful way of looking at chord progressions because it quickly shows us what notes are used throughout the progression.
We can see that the notes B, C#, and F# are used the most across the chords. As we’re in the key of B, it’s not surprising that B is used a lot in the chords. F# is the 5th of B so it’s natural for it to also be used a lot.
What might be surprising is how often C# is used. C# is the 2nd note in the B Major scale and is used in every chord in this progression apart from Badd11. When we look at the lead guitar parts, pay attention to any time you see C# used and think about how it sounds.
The notes D#, E, G#, and A# aren’t used quite as much, but still, add color to the progression. A#, the 7th note in the B Major scale, is only used on the final chord of the progression and it stands out as soon as you hear it. When you hear the F# chord and the A# in that chord, there’s no mistaking that it’s the last chord of the progression. We don’t hear A# anywhere else in the progression which is why it stands out so much when we do hear it.
If you want to hear how much these chords add to the vibe of the song, play the following chord progression using basic chord shapes: B, E, F#. If you tried to improvise over the top of that progression, you’ll quickly find out how limiting it can become.
Arpeggios vs Strumming
The chords are played as arpeggios (one note at a time). Try playing the above progression with a simple strumming pattern and you’ll hear how it changes the feel of the song.
When you strum chords, all the notes in the chord are blended together. When you play the same chords as arpeggios, you can hear each individual note and the way it colors the chord. If these were simple Major or minor chords it may sound better by strumming the chords. But as these chords aren’t your typical open or barre chords, playing them as arpeggios help them shine.
This is really important to think about because we hear this progression for almost the entire song. If these chords were strummed throughout, we would quickly get tired of hearing them. If you want to write a simple song like this, experiment with arpeggios rather than strumming your chord progressions.
Picking pattern
The picking pattern used for the arpeggios is also as simple as it gets. The exact same pattern is used throughout the entire song which helps keep it consistent and keeps the attention on the lead guitar. If the picking pattern changed throughout the song, it would take attention away from the lead guitar, which wouldn’t suit this song.
When writing your own songs, think about where you want the listener’s attention to be. In this song Joe wanted the attention on the lead guitar, so the rhythm parts are all simple and consistent throughout the song. Another good example of this is in the song For the love of God by Steve Vai. The simple progression in that song gives room for the lead guitar.
I IV V
This progression follows the ridiculously common I IV V format. If you’ve ever tried to write something with this progression, you might have found how easy it can be for it to sound cliche or boring.
What makes this song different is the way the V chord is used. The V chord in the key of B is F#maj. But in this progression, Joe doesn’t play F#maj until the very last chord in the progression. Instead, he plays F#sus4. By removing the 3rd from the chord (A#), we don’t get that resolved sound we would normally hear in a I IV V progression. This is also why when we do hear the final F# chord, it does have that resolved sound.
The lesson to take away here is that you can still use common patterns such as I IV V and get a good result. It’s how you use the chords that matter.
Main Melody
The key of the ‘A’ section is B Major. If you look at the song structure chart earlier, it shows that since most of the song is in the ‘A’ section, most of the song is in the key of B Major. This is important to remember when we get to the ‘B’ section later.
Writing a melody in a Major key without it sounding cheesy can be tough. The challenge with writing in a Major key is that you can feel extremely limited. Rock and metal guitarists tend to stick to minor scales and keys because they offer more freedom.
Here’s the main melody:
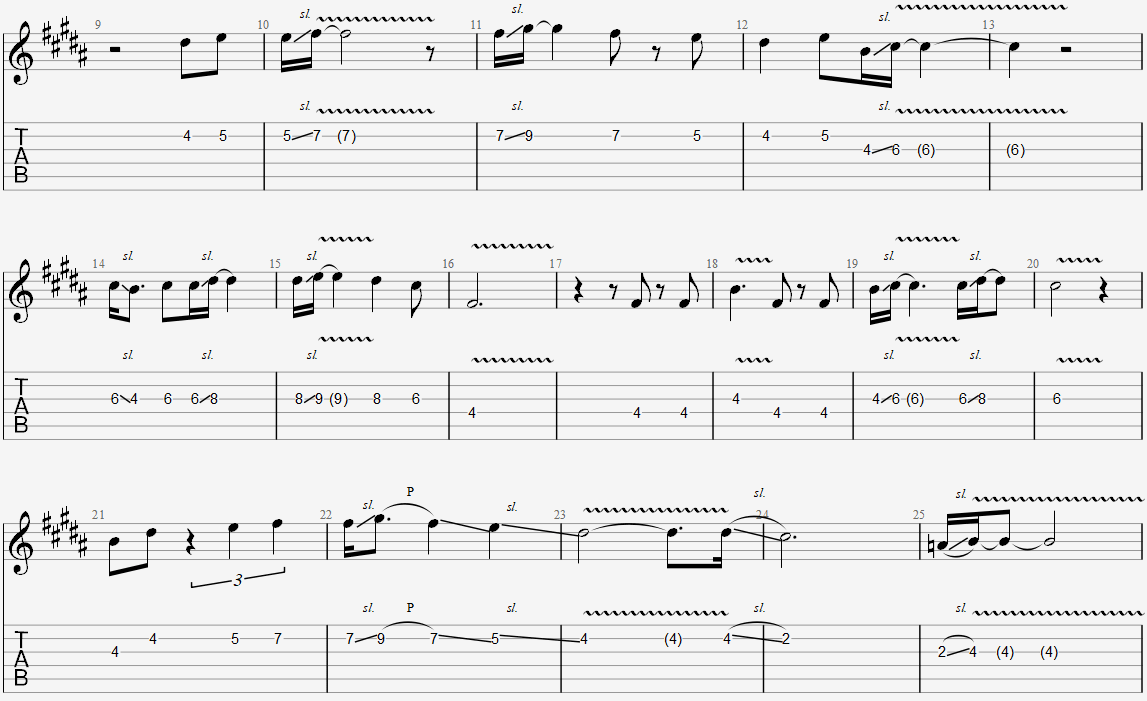
It’s a long melody that stretches over the entire 16 bar progression. If you try and write a 16 bar melody, you’ll find that it becomes challenging really quickly. Trying to keep it memorable without it sounding like a solo is hard.
Held notes
Let’s look at the melody again and highlight the last note held on each phrase:
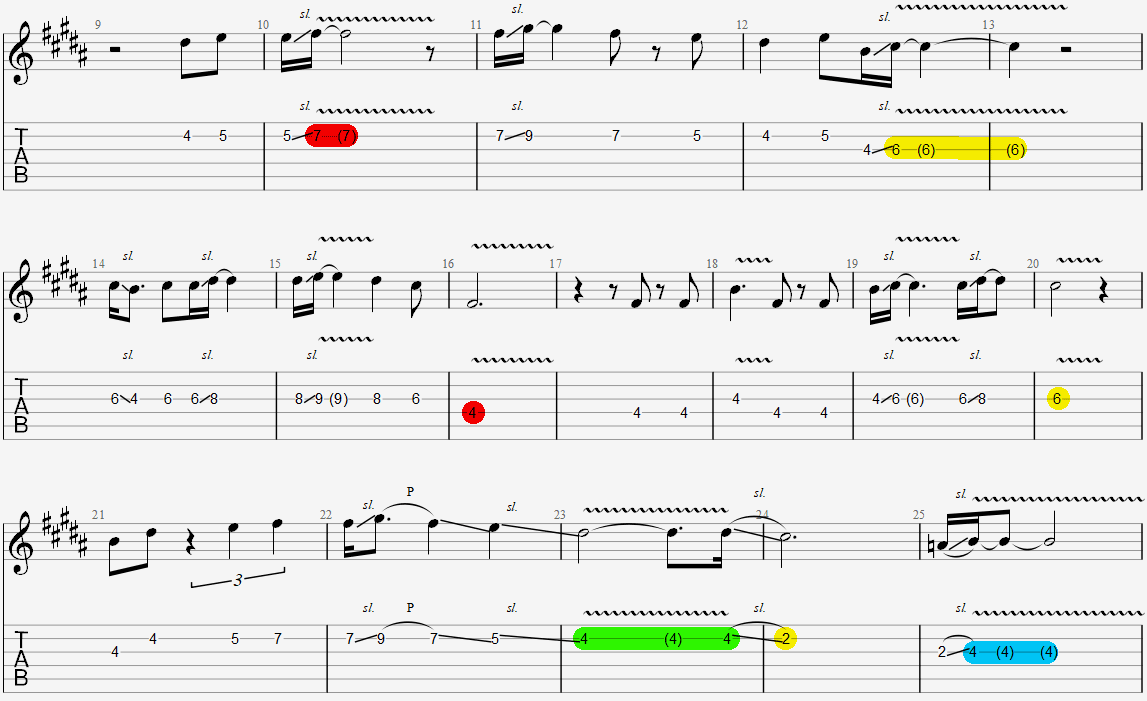
The last note of a melody line plays an important role. The note you choose to end your melody on can make or break it. Some notes will give an unresolved feeling which makes the listener expect to hear more. Other notes give a resolved feeling which gives the listener the expectation that the melody has finished.
The only notes used in the highlighted notes above are F# (red), C# (yellow), D# (green) and B (blue).
B (blue) is the root note and gives a resolved feeling. It’s no surprise that the only time Joe holds it is the very last note of the melody. There’s no mistaking that when we hear that note, the melody has finished. Try replacing one of the other highlighted notes with a B and you’ll hear how it ruins the flow of the melody.
You might also notice that the B in the melody is played after the F# chord. Hearing the F# chord already gives us a strong resolved feeling and when this is followed by the B in the melody, it becomes even stronger.
F# (red) is the 5th note of B and it does give some resolved feeling to the melody. Nowhere as near as the root note, but it does give some resolved feeling. Notice how it’s only used half-way throughout the melody? It’s like taking a breath between sentences. We get a resolved feeling, but we still expect more because the chord in the background didn’t sound resolved.
The C# (yellow) notes give an unresolved feeling which keeps the listener expecting to hear more. When writing a melody, avoid landing on chord tones (root, third, fifth) if you want the melody to keep going. Landing on something like the 2nd (C# in this case) keeps us expecting to hear more.
I’ve also highlighted the held D# (green) because it’s held for an entire bar towards the end of the melody. D# is the 3rd of B and gives us the Major quality of B. Compare this held note to the other uses of D# in the melody. In the rest of the melody, it’s used sparingly as a passing tone. Try holding it early in the melody and you’ll hear why it’s probably not the best choice. Holding it towards the end of the melody adds to the resolve we hear at the end.
Chord tones
Let’s look at the melody again and highlight all the chord tones. This will help us see how closely the melody follows the chords in the progression:
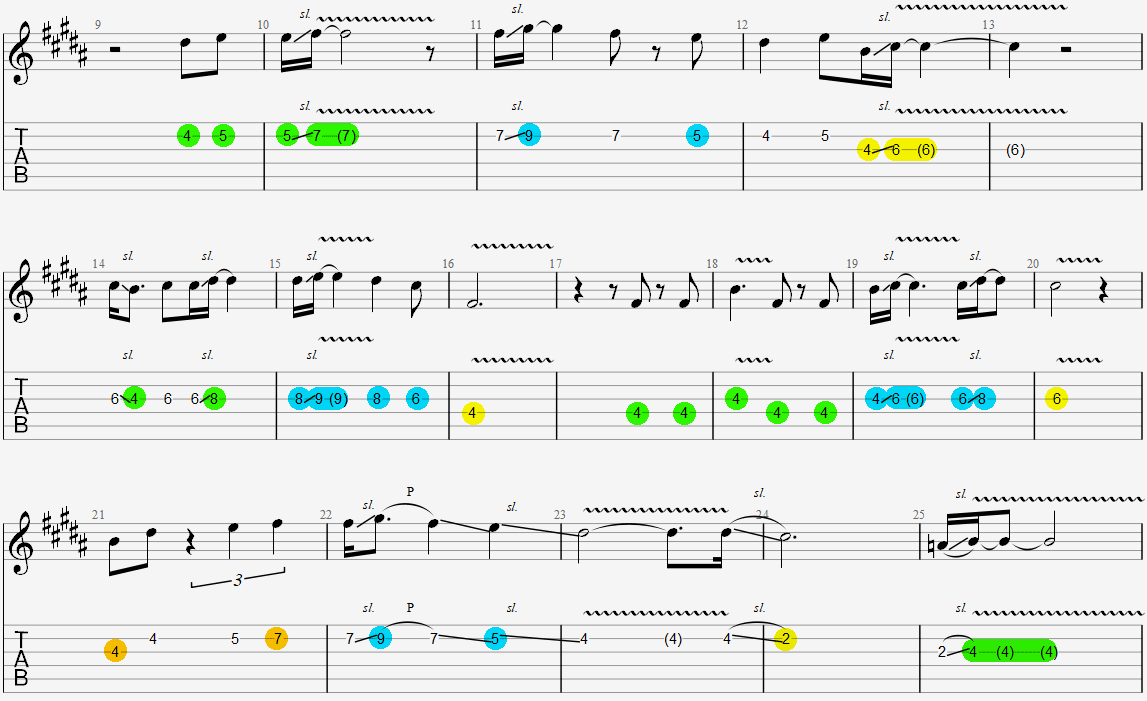
The change in color shows the chords changing in the background. It should be clear from looking at the above image that the melody follows the chords very closely.
There are some sections of the melody that only use chord tones. This is why the melody fits so well over the chords and shows why some knowledge of music theory can help you compose better parts. Knowing what notes are being played in the rhythm parts while you play lead helps you write better melodies.
Elevating past the melody
After the main melody finishes, it almost sounds like it starts again before venturing off into some higher notes and new licks.
This is a great way to bring the listener full circle after the end of the melody and then surprise them by doing something new. If Joe went straight into a typical solo without reintroducing the first few notes of the melody, it could sound a bit jarring (try it for yourself). If he played the entire melody again with only small changes, it might feel a bit repetitive or dull (try this yourself over the backing track).
What’s important here is that he isn’t trying to ramp the intensity up into a blistering solo. If you try ripping into a solo at this point, it makes the rest of the song hard to follow.
‘B’ Section Chord Progression & Key
The change from the ‘A’ section to the ‘B’ section is very interesting and opens up so many possibilities for the lead guitar.
Pitch Axis Theory
The song changes from the key of B Major to the key of B minor. This is something Joe does a lot in his songs and he often talks about as ‘Pitch Axis Theory’. The simplified explanation is that we stick to the same root note (B) and change some other notes to change the feel of what we’re playing.
In this song, B is our pivot point or axis. We were in Major during the A section and now we’re in minor. In other Satriani songs, you’ll hear him pivot to different modes such as Lydian or Phrygian. In this song, it’s a simple change from Major to Minor (or Ionian to Aeolian if you’re thinking about modes).
The change from Major to minor is significant. I explained earlier that major keys can feel restrictive in what you play. Minor keys, by comparison, feel liberating. You have much more freedom when playing in minor which is partly why so many guitarists love to stick to the minor Pentatonic scale.
It’s no surprise that when Joe enters the B section, his lead playing opens up quite a bit. If you try improvising over the backing track (shared later on) you’ll feel how liberating the B section is compared to the A section.
Chord progression
The idea behind Pitch Axis Theory is you only slightly shift from what you started with. So the chord progression in the B section is almost identical to the progression in the A section apart from a few subtle changes.
Here is the chord progression in the B section:
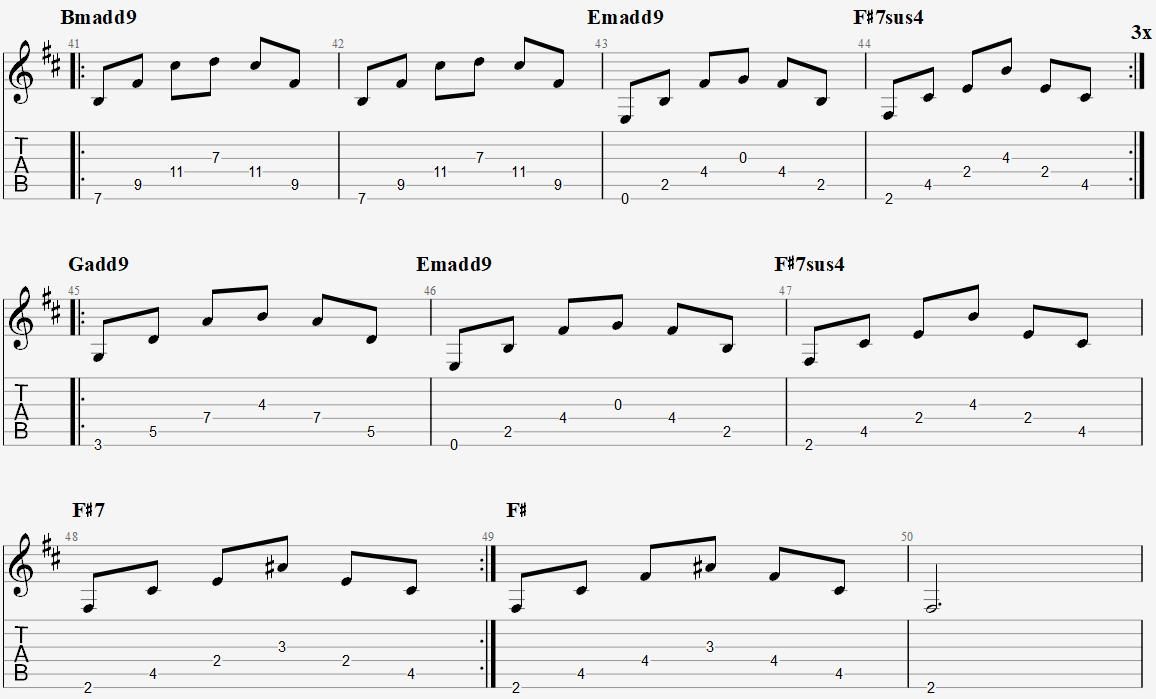
Notice that each chord is based on the same root note (eg: B, B E, F# for the first four chords), but the extensions and quality of the chord have changed. Badd11 turns into Bmadd9. We started with a Major chord and end up with a minor chord.
We have the same I IV V progression, only this time we’re in minor. That’s the main idea behind pitch axis theory and it’s something you might want to play around with.
Compare the below chart with the earlier chart to see the slight shift in notes between the two sections:

The above chords focus heavily on the notes B, C# and F# which is the same as the A section. As the only real change is from Major to minor, the only notes that do change are the 3rd (D), 4th (E), 6th (G), and 7th (A). These are the notes that give us the minor tonality so you might be surprised with how sparingly they’re used.
The above chart should show how powerful Pitch Axis Theory can be. Only changing a couple of notes can completely change the feel of a song and the different ways you can express yourself with lead parts.
You’ll also see how the last two chords use A#, which isn’t part of the B minor scale. This helps bridge the song back to the A section as explained below.
Lead guitar
The change from Major to minor is only a slight change. But it’s more than enough to give the lead guitar room to head in different directions.
Here is the lead guitar with the chord tones highlighted:

The blue highlighted notes show the chord tones to Bmadd9. There’s no mistaking that the song has entered into a parallel minor key when the lead guitar comes in. The 21st fret bends up to the minor third of the chord which greatly exaggerates the change to minor.
For the next two chords Joe heavily focuses on the minor third of the chord. The 14th fret bends up to the minor third of Emadd9 and in the next bar the slide up to the 17th fret is the minor third of F#. Focusing on the minor third is a great way to get that moody sound we expect from a minor scale.

The above scale run shows how closely Joe sticks to the chord tones and how it colors the song. If a typical Pentatonic scale run was used, it would lose a lot of what makes this song interesting to listen to.
A lot of guitarists tend to think in patterns or shapes when playing scale runs. Try thinking about chord tones and listen to how it changes what you play. The above scale run is an excellent example of how to think about the background chords while playing lead.
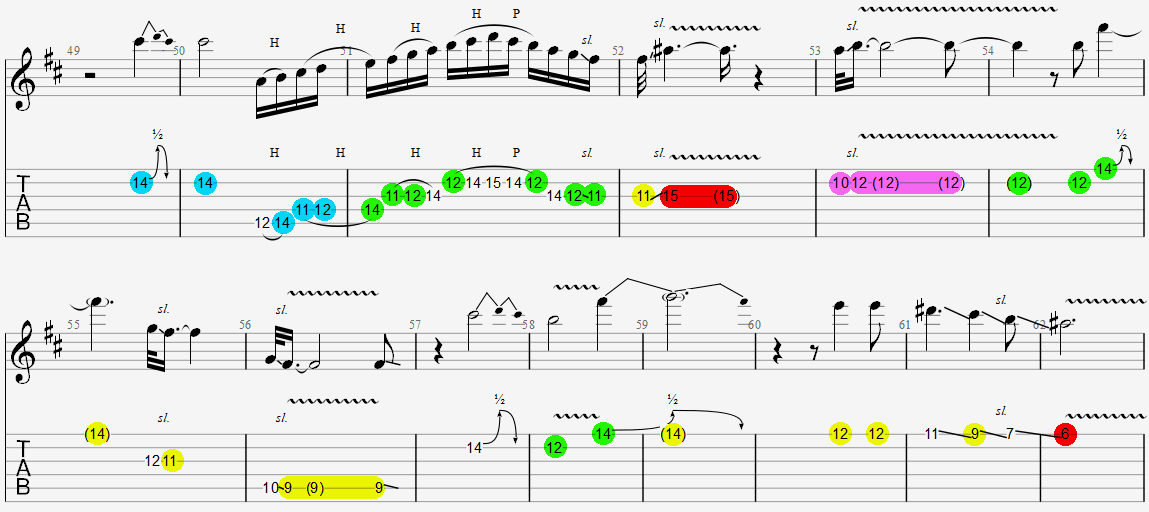
The rest of the B section closely follows the chord tones. The red highlighted notes stand out when you listen to them because they’re actually the Major 3rd of F#. As you saw earlier, these notes don’t fit into the B minor scale so help set the expectation that we’re going to be moving back to a Major key. That first red note really stands out when you first hear it and adds some interesting tension. In other Satriani songs, you can hear this all the time.
In your own playing, try experimenting with the minor/Major third intervals. Create an ambiguous chord progression (by playing suspended chords), then bounce back and forth between the minor third and the Major third. It will quickly become clear how useful this can be to create interesting ideas.
Change back to section A
In the last two bars of the B section, you might notice the lead guitar change back to the B Major scale. This creates an anticipation that we’re changing back to Major.
When you’re improvising, if there’s a key change coming up, experiment with ways you can create a sense of anticipation for that change by changing what you’re playing before the key changes.
Return of the melody
Changing back to B Major brings us familiar chords we instantly recognize from earlier in the song. But the lead guitar also helps bring us back into the section A frame of mind by reintroducing the main melody.
The difference is the main melody is played an octave higher than the first time we heard it. Shifting melodies up an octave is a simple way to give it more energy. Try this out yourself to hear how effective it is: play a simple melody then play it again an octave higher. You’ll feel the increase in energy or intensity when you play it again the second time.
Tapping section
After the main melody finishes, Joe enters into a tapping section. The 12th fret of the B string is tapped with the right hand while the left-hand alternates between the open B string and hammering-on to fretted notes. It’s easy to understand what’s happening here. The open B string and the 12th fret B really drive in the B tonality of the song. This continues throughout the progression without changing to different strings or changing the right-hand note.
Joe could have easily shifted the right-hand note to other notes that match the chords but didn’t. For example, he could have shifted the right-hand note every bar and pick out a chord tone (eg: E for Emaj7add13, F# for F#sus4, etc.). Try this yourself and listen to how it changes the tapping sequence.
By sticking to B, it creates something different. When you play the same note over changing chords, the feel of that note changes because of the change in interval. B is the root note of the first chord (Badd11), the 5th of Emaj7add13, and the 4th of F#sus4. So B will sound different over each chord because we’re hearing a different interval. Check out my lesson on intervals if you’re unsure what any of this means.
This can be a really effective way to add something new to a lick, melody or idea. Instead of coming up with something new for the next chord, play the same idea again. You will hear it in a different way when you play it over a different chord.
Pentatonic soloing
After the tapping section where Joe ramps up the intensity, there’s a short section where he jams with the Pentatonic scale. In other songs, a Pentatonic-based solo is the ‘typical’ way to play. In this song, it stands out because the rest of the song avoids ‘typical’ Pentatonic soloing. For guitarists who feel like they’re stuck in a rut with the Pentatonic scale, this song is a great example of how to break out of using box shapes and add more color into your lead playing. Limiting the Pentatonic scale to small sections of a solo like it has been used here is a great way to keep things fresh.
Final melody
After the climax of the song, Joe finishes off by returning to the melody in the original position. This is a great way to drive the song home and return the listener back to something familiar.
Apply The Theory With This Backing Track
The above explanations help you get a sense of what’s happening in the song. But it’s one thing to read my explanations and a very different thing to experiment with the ideas yourself.
The below backing track gives you the full song with the lead guitar removed. It’s an excellent way to experiment with the ideas and theory I’ve covered in this article.
https://www.youtube.com/watch?v=q371CCyM6j8
Here are some ideas for you to experiment with while playing with the above backing track:
- Improvise over the chords without thinking about the original song at all. This can be hard if you already know how to play the song, but trying to forget the song and come up with something original is a great challenge. You know the song starts in B Major, shifts to B minor, then changes back to B Major. Play around with those scales and try to come up with your own melodies and ideas.
- Practice writing melodies. Learn to finish a phrase on a non-chord tone and only land on a chord tone when you want to resolve the melody.
- Start with the song’s melody, then when the B section comes up, try coming up with something completely different to emphasize the change from Major to minor.
- Come up with a 16 bar melody to replace the song’s main melody. Follow the song structure with your main melody, then return to it at the very end. Learning to re-write the song while keeping the main ideas and structure is a great way to take the theory and make it a part of your playing style.
If you want to take the theory further, here are some ideas and challenges to try out:
- Try writing a song following the A B A structure this song follows. Use the Pitch Axis Theory to shift to a different mode during the B section. The simple song structure is a great way to keep things simple and focus on your lead guitar writing.
- Start with this song and replace the B section with a different mode. For example instead of shifting to B minor (Aeolian), shift to something else like B Phrygian or B Lydian. Transpose the lead guitar into that mode or come up with your own ideas that suit that mode. This is a great way to get a feel for how useful Pitch Axis Theory can be.
- Write a simple chord progression then write a melody that closely follows the progression this song does. Writing natural sounding melodies while keeping chord tones in mind can be tricky at first. But with enough practice, it can transform your playing.
I hope you enjoyed this brief analysis of Always With Me, Always With You by Joe Satriani. If you found it useful, please share it on social media so others can check it out too.
If you want to learn more about Joe Satriani, check out my Ultimate Guide on Joe Satriani: Tone, Gear and Effects here.


