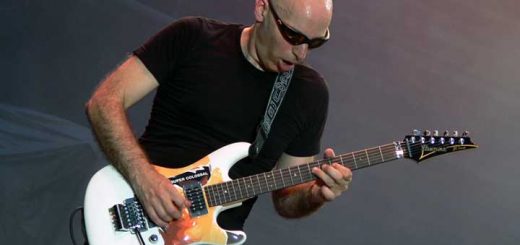
Plastic Dracula by Paul Gilbert (with TAB) | Guitar Lick Spotlight
About the Song: Plastic Dracula
Plastic Dracula is the 9th track off of Paul Gilbert’s 2010 album, Fuzz Universe. While it might not be as well known as the album’s title track, it’s an absolute gem filled with expressive playing.
The bendy main melody after the intro riff is a great example of how expressive guitar can be. Paul colors his guitar tone with subtle use of effects throughout the album which adds some great character to the parts.

About the Guitarist: Paul Gilbert
If you haven’t heard of Paul Gilbert or haven’t heard his music before, check out his vast range of work. His advanced technical abilities might scare some players off at first, but there’s plenty of simpler parts for you to really dig into.
The songs Scarified and Technical Difficulties are two of his most well-known songs and worth checking out for some impressive guitar playing.
He has 14 solo albums so far, so after you learn this lick there’s plenty more to check out.
Guitar Lick TAB
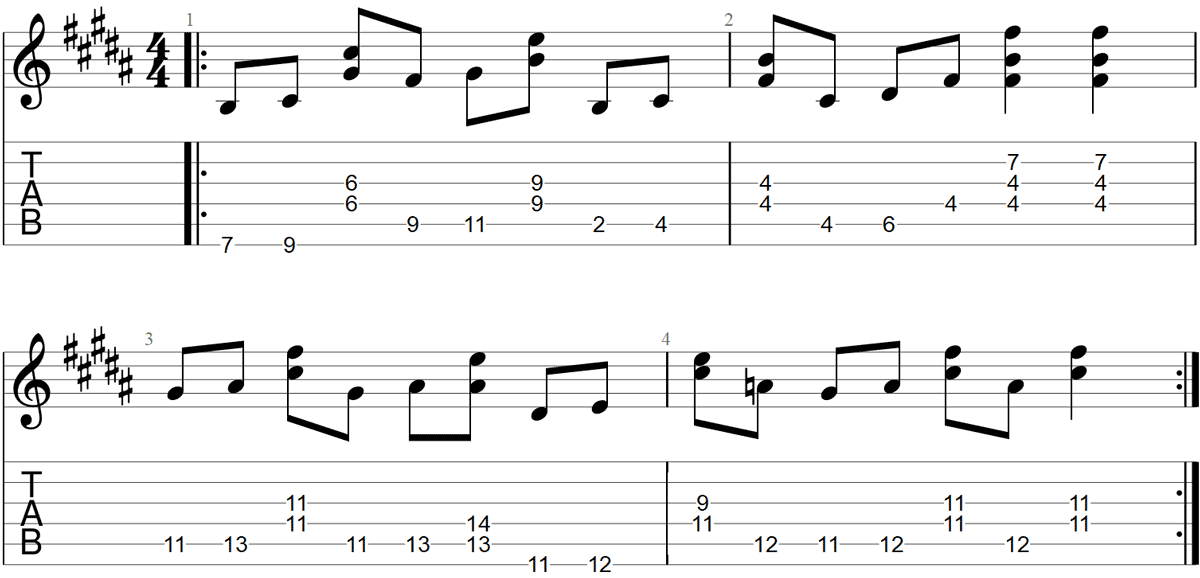
Here’s the intro riff to Plastic Dracula in TAB and standard notation:
What I like about this lick
I love this riff for a couple of reasons. First, it’s really fun to play at full speed. The colored guitar tone and light use of gain
Second, I like the unconventional way of playing this progression. As Paul explains in the below video, he wrote this riff based on a simple chord progression. Instead of playing standard chords, he splits the chords up and moves the bass notes around.
Here’s a video of Paul demonstrating the lick as well as explaining how he came up with it.
Guitar Lick Video
Here’s a video of me demonstrating the riff at full speed as well as half speed to a metronome:
Music Theory Analysis
Paul wrote this part by taking a simple chord progression, then breaking each chord down. Instead of strumming each full chord, he only plays a part chord hit with some moving bass notes.
Take the first three notes as an example. The first note is a B, followed by a C#, followed by a G# and C# played together. The C# & G# are part of the C#m chord. While the third isn’t played, we know that the chord would be minor based on the key. So Paul takes the root (C#)and fifth (G#) from the chord, then adds two moving bass notes before the chord hit. It’s a simple
Let’s look at the rhythm for a different way of understanding this riff.
If you break down the TAB, you can see a simple pattern: two bass notes, followed by a double-stop (two notes at the same time). This gives us a pattern of three eighth notes for each chord. Look at where each double-stop is in the bars and you’ll see why this is interesting.
Typical rhythm parts will emphasize beats 2 and 4 to give a steady pulse. By creating a part with groups of three in 4/4, we end up with a nice polyrhythm. It doesn’t last long however as the end of the second and fourth bars tidy things up.
I recommend trying to come up with a similar part and explore what would happen if you keep the three note pattern going. If possible, play over a drum machine in 4/4 and get a feel for how the groups of three fit over that.
Technique and Practice Tips
This part is played at 156 bpm, which is very achievable for intermediate guitarists. Play it using all down-picking for the best results.
Experiment with using palm muting to tighten up the part. This type of riff sounds great with heavy palm-muting, light palm-muting, or no muting at all. Try to match the tight sound you hear in Paul’s playing, then experiment with finding the amount of muting you like the best.
In the video above, you can hear that I’m using some light palm-muting to give the notes a chunky feel. When I hit the quarter-note chords, I lift the palm-muting off to let the chords ring out clearly. Try this out at a slow tempo to practice your muting control.
Use a metronome to gradually work up to full tempo. By starting off slow, you’ll become comfortable with the fast jumps between chord shapes. If you focus on tight playing, by the time you reach full speed you’ll feel confident in your technique.
Guitar Tone Tips
Paul uses various effects throughout his Fuzz Universe album to add color to his guitar tone. In this riff, you can hear some subtle use of chorus and reverb. You can learn how to identify effects in songs like this one in my Guitar Effects Course.
In the above video the guitar might sound like the chorus is cranked, but the mix on the pedal is set very low. You only need a little bit of the effect mixed in for it to color the tone.
While this is a driven riff, it uses less gain than you might think. The chorus effect adds some saturation to the tone, which means you can use less gain and still get a nice thick tone. Dial the gain back until you almost have a clean tone, then gradually adjust it up and down until you find the sweet spot.
You might be surprised with how little gain I’m using in the above video. While it does sound quite saturated, the gain is incredibly low. I’m ‘stacking’ a Tubescreamer with a slightly driven amp, which is an excellent way of rounding out your drive tone. I explain how to do this and how it compares to other methods in my Guitar Effects Course.
While it’s a lot of fun to crank the gain, you’ll get more definition in your playing with lower gain settings. Keep the gain lower than you normally would and you might find you end up preferring the tight and punchy tone it gives you.
Take This Lick Further
If you need help learning this riff, or you want to learn how to write similar riffs for your own music, I can help you. In Skype Guitar Lessons with you, I can work with you on this song or any other topic you want to work on.
If you want to learn how to use effect pedals to color and shape your tone, check out my Guitar Effects Course here. It covers all types of effects and gives you everything you need to know to combine and incorporate effects into your rig.

