Killing In The Name by RATM (with TAB) | Guitar Lick Spotlight
About the Song: Killing In The Name
Killing In The Name (also known as “Killing In The Name Of” due to the lyrics, but there’s no “Of” in the song name) is Rage Against The Machine’s most well known song from their 1992 self-titled album.
While there are plenty of great guitar riffs in many RATM songs, the main riff to Killing in the Name is iconic. If you haven’t already learned this song, it’s great fun to play from start to finish.
About the Guitarist: Tom Morello
Tom Morello is known for his simplistic riffs and effects-driven solos. He writes unconventional solos that make use of effects such as the Whammy Pedal. If you’re looking for ways to take your playing in new directions, it’s worth studying some of his work in RATM and Audioslave.
If you want to learn about Tom’s use of gear and effects, read through my guide on his RATM rig and his rig during Audioslave.
Guitar Solo Video
Check out the below video for a demonstration of the solo with and without the Whammy pedal:
Guitar Solo TAB

What I like about this solo
It’s a bit of stretch to call this a solo because it’s so unconventional. It’s pretty common for songs to go verse-chorus-verse-chorus, then lead into a solo. That’s what this song does, but the style of playing is completely different to a typical rock or metal solo.
The first time I heard this solo I had no idea what was going on. I’m sure a lot of guitarists have the same reaction when they first hear it. At the time, I didn’t even know what a Whammy pedal was. A lot of Whammy-based solos you hear today have been partly inspired or influenced by Tom Morello.
I like the simplicity of this solo. When you play it without using a Whammy pedal, it’s pretty straight forward. An intermediate guitarist might write something like this as their first attempt at writing a solo. But when combined with the Whammy pedal, it becomes something special.
This solo is a great example of how gear and effects can fuel your creativity and take your playing in new directions. A Whammy pedal is incredibly fun to play with and opens up so many doors in your playing.
If you’ve never used a Whammy pedal before, this solo is a great starting point.
Gear and Effects
This solo is made possible thanks to the DigiTech Whammy. While there are other pedals you can use, the DigiTech Whammy is the go-to option for this effect.
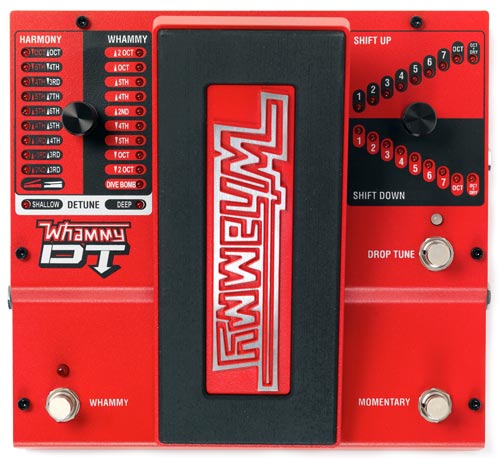
The below DigiTech Whammy DT (which I review in full here) is an excellent pedal. It gives you the pitch shifting whammy sound you hear in this solo, but it also has other functions such as a harmony mode, drop-tuning, and a momentary switch.

In this solo, the Whammy is set to shift the pitch up by 2 octaves when the pedal is in the toe position. This means when your pedal is in the heel position, you hear your standard pitch. When the pedal is pushed forward, it bends the pitch up until it reaches +2 octaves.
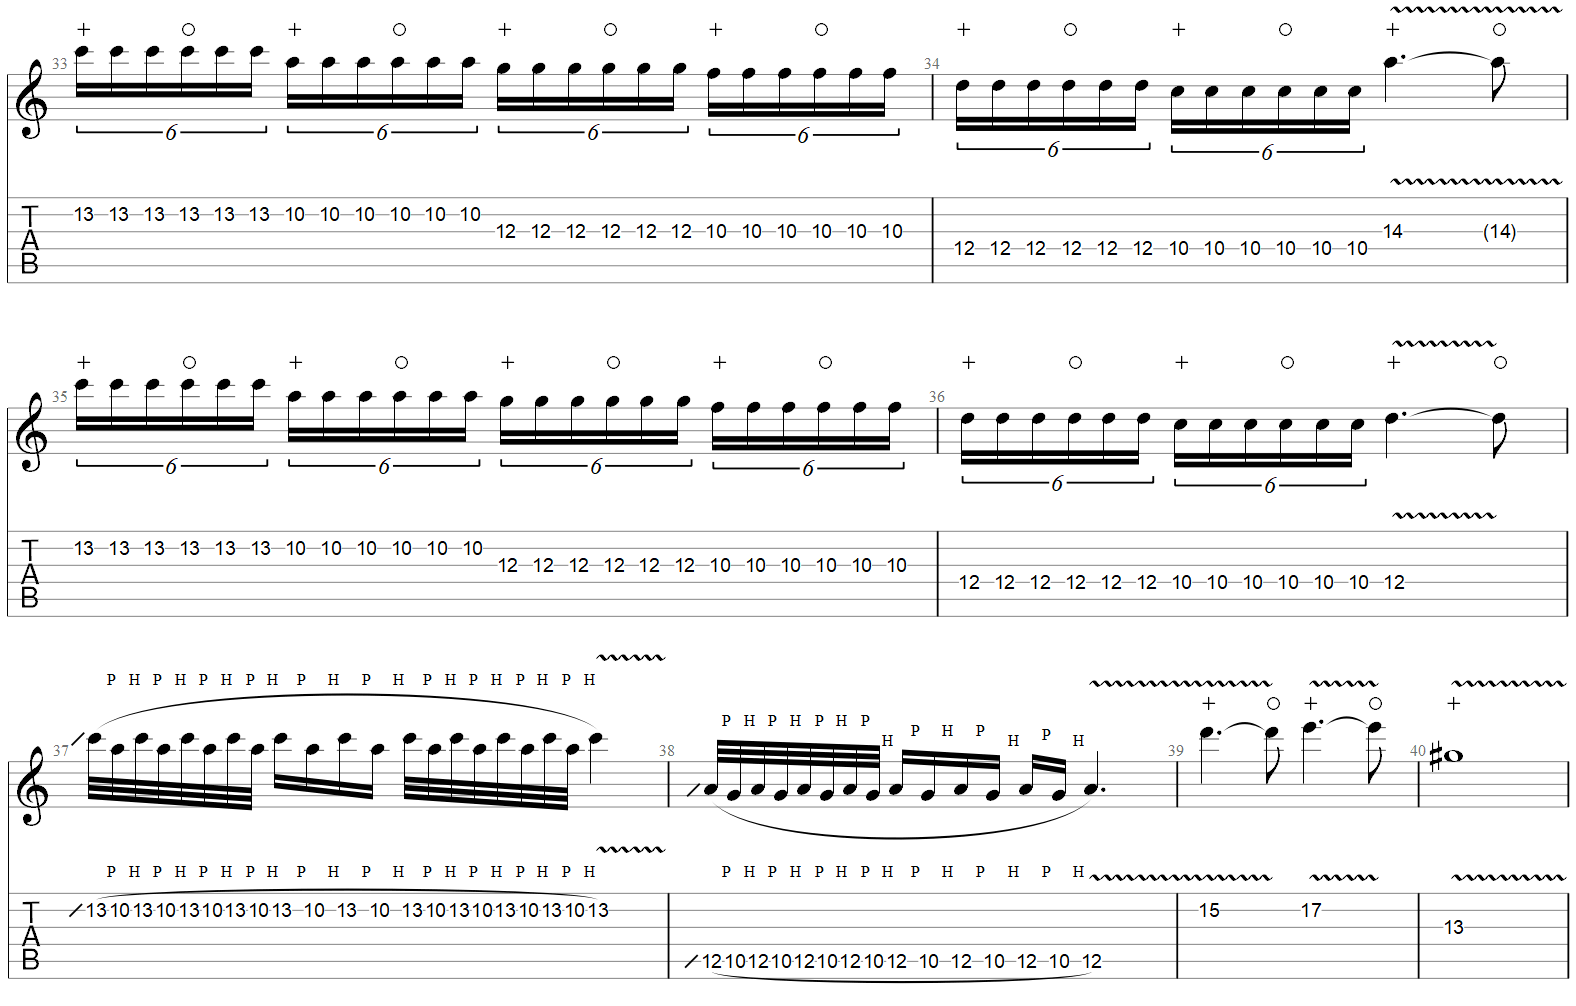
In the above TAB, you’ll notice + and O symbols. These symbols are used to show when an expression pedal (like a wah or Whammy pedal) is used. The + means to move the pedal into the toe position and the O means move the pedal into the heel position.
If you have a multi-effects pedal with an expression pedal, you can achieve the same effect. If your pedal doesn’t give you the option for +2 octaves, set it to +1 octave. It won’t sound quite the same, but it will be close enough.
Adding in multiple delays set at different times creates a thicker sound. Tom often uses two delay pedals at once to create a bouncing back and forth sound. The solo to Audioslave’s Like a Stone is another good example of the Whammy pedal and delay pedals working together.
For some exercises and tips with using a Whammy pedal, check out this lesson on How to Use a Whammy Pedal.
If you’re interested in other songs using a Whammy pedal, check out this list.
Music Theory Analysis
When you look at the first part of the solo, you might recognize the scale shape. It’s based on the first minor Pentatonic scale box shape. Starting on the 10th fret means this solo uses the D minor Pentatonic scale.
As the guitar’s tuning is in Drop D and the open D string is used a lot in the riffs, it makes sense to use the D minor Pentatonic scale.
The first part of the solo is a simple descending run through the scale. Apart from the fast picking, it’s as simple as it can get. This is a good example of how useful the Pentatonic scale can be. When used properly, it can take the guesswork out of what notes to play.
The last note in the solo stands out and sounds almost out of place. If you look at the interval (check out my lesson on Intervals here if you’re unfamiliar with them) between the root note D and the last note (13th fret on the G string is G#), it’s a diminished Fifth/augmented Fourth.
This is an interesting interval when used properly. You may have heard of the term ‘tritone’. A tritone is an interval of six semitones, so yet another name for this interval. The tritone also has the nickname “the Devil’s Interval” due to the history of the Locrian mode. But the main point to remember with the tritone is it’s incredibly dissonant sound.
By ending the solo on a tritone, it creates a lot of tension. Try experimenting with tritones in your playing. While there will be a lot of times when it sounds completely horrible and out-of-place, there will be other times when it’s just the right sound for what you need.
Technique and Practice Tips
Compared to other licks I’ve covered in my Guitar Lick Spotlight series, this solo is pretty straight-forward in terms of technique. Here are a couple of things to keep in mind when learning this solo:
- Be consistent. There’s nothing worse than hearing somebody
attempt this solo and tripping up on the string as they try to use tremolo picking. The fast alternate picking only sounds good when it’s played consistently. When people try to play it faster than they’re currently able to play, it sounds horrible. Start out by playing it slowly and gradually increase the tempo. Consistent picking sounds far better than trying to play full-tilt and messing it up. - Sync your foot motion. Think about how quickly you want the pitch to glide and when to start shifting your foot position. Practicing at a slow tempo is a good way to experiment and sync up your Whammy motion to what you’re playing.
- Experiment with different delay settings. This solo sounds completely different when you add in some delay. It thickens up your tone and makes the pitch-shifting sound far more interesting. Experiment with different delay times and feedback levels to find what works best for you.
Take This Solo Further
If you have a Whammy pedal and want to learn how to get the most out of it, here are a few things I recommend:
- Learn how to combine the Whammy pedal with other effects. Tom Morello often combines the Whammy with other effects to create new and interesting sounds. Check out my Guitar Effects Course to learn about other effects.
- Learn how other guitarists use the Whammy. As soon as you get bored of rapidly moving the pedal back and forth, you might feel there’s nothing else you can do with it. A great way to overcome this creative hurdle is to see how other guitarists use the Whammy. Check out this list of songs using a Whammy pedal for inspiration.
- Learn music theory. The more you understand about intervals, the easier it will be using the different modes and features of the Whammy pedal. This is something I’ve helped a couple of my students with in my Skype Guitar Lessons. Learn how to use the Whammy in a musical way by understanding a bit of music theory. You’ll be surprised with how many new directions you can take your playing once you learn a bit of theory.


