Simple Guitar Songs For Beginners
This lesson is for complete beginners first starting to learn to play guitar. These are the easiest possible songs to learn on guitar which give you an easy starting point to fretting notes correctly, picking one string at a time and forming a basic rhythm.
If you don’t yet know how to play anything on guitar, the simple songs and melodies in this lesson will give you a great starting point.
What You Need For This Lesson
- Basic understanding of guitar parts see lesson here
- Able to tune the guitar
- Basic understanding of guitar tablature (Guitar TAB)
- Practiced the simple exercises here and can play them comfortably
Finger Positions For These Songs
There is no rule on which fingers you should use to play different notes. But for this lesson it’s helpful if you follow some simple finger positions.
For the songs in this lesson, use the following fingers on each fret:
1st Fret – Always played by the first finger (index finger)
2nd Fret – Always played by the second finger (middle finger)
3rd Fret – Always played by the third finger (ring finger)
4th Fret – Always played by the fourth finger (pinky finger)
So whenever you see a note on the second fret (on any string), you will play it using your second finger. When a note is on the third fret, use your third finger.
Think of this as a simple guide. If you don’t need to figure out which fingers you need to use, you have less to worry about as you’re learning the songs. This guide helps you focus on getting the notes to sound perfect instead of thinking which finger to use. Later on in a later lesson I will explain how to decide which fingers to use.
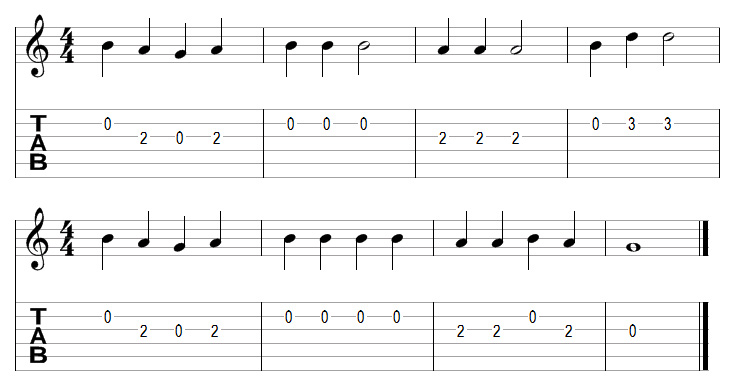
Mary Had a Little Lamb
This song is very basic but take your time to make sure it sounds perfect. If you rush these songs you will only make things harder for yourself later on. Start off playing as slow as possible so you have time to think about what you are playing. Once you have memorised the notes you can slowly build up the speed. The vertical lines through the tab are ‘bar lines’. These lines split up the music into sections. When learning this song, learn one measure (section between the bar lines) at a time.
Start off playing the first four notes and stop at the first bar line. Then repeat the first four notes a couple of times to help you memorise them. Then you move to the next measure and repeat it a few times. Continue this way until the end. Once you have practiced each measure a few times you can have a go playing the entire piece at once. If you get stuck after a few measures or forget notes, work backwards. Instead of playing the whole piece in one go, split it into two halves and play one half a few times then the other half a few times. Once you are comfortable with both halves, join them together. Follow this process with every song you learn and you will find it quick and easy to learn music.

When playing this song remember the finger positions written above. You only need to use two fingers for this song; the second finger (middle) and the third finger (ring). Make sure you don’t mix up which fingers you play it with.
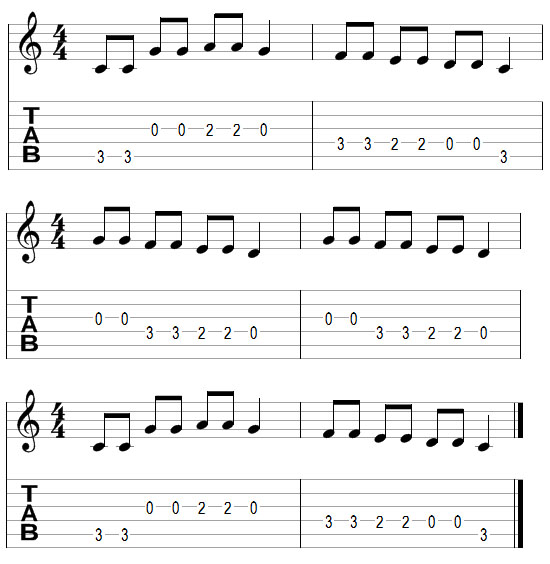
Twinkle Twinkle Little Star
This song is again very simple. Take it one measure at a time and slowly put the whole piece together once you feel comfortable with each measure separately. This song uses the same two fingers as the first song; the second and third. Remember that the second finger plays the second fret and the third finger plays the third fret.

Once you feel comfortable playing it slow, build up the speed. But don’t try and play it too fast or it will sound rushed.
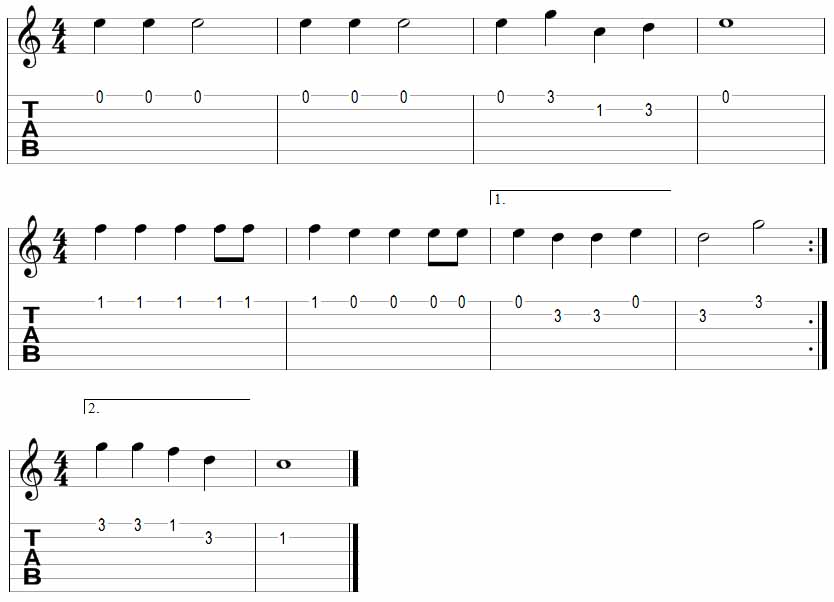
Jingle Bells
The reason for doing well known songs like these is that it helps you learn them faster. Knowing how a song should sound will help you tell if you are playing the right note or not. If you play a note and it sounds nothing like the song, check that you are playing everything properly. Really try to focus on listening to what you are playing. Although many people think they are listening to what they are playing, many don’t actually listen and don’t even notice when they play wrong notes.
New symbols to learn
We have a couple new things to learn with this piece. After the eighth measure, instead of a bar line there is a thin line, a thick line and two dots to the left of the lines. This is called a repeat sign. It has been borrowed from standard notation (you can see the same repeat sign on the standard notation). This repeat sign is instructing us that once we get to this part of the music, we go back to the start (or back to wherever there is another repeat sign with dots on the right side of the lines) and play that section again. You will see this often so understand what it means. In the video demonstration you can hear that after the eighth measure, I continue playing from the start.
The next instruction we need to look at is the 1. and the 2. with the horizontal line above it. These are called ‘alternate endings’. The first one is instructing us to ‘play measures 7 & 8 the first time’ and the second one is saying ‘on the repeat, instead of playing measures 7 & 8, play measures 9 & 10’. Don’t stress if you don’t understand that explanation. Have a look at my video demonstration and follow what is being played with the tab. It should become clear after hearing it played.
At the very end of the piece there is a thin line followed by a thick line. This double line instructs us that the piece ends here. Don’t confuse it with the repeat sign. If you see two dots facing left, it is a repeat sign. If it doesn’t have the dots, it is the end. Of course if there are no more bars past the double line it goes without saying that the piece is finished.

The fingers used in this song are: the first finger for the first fret and the third finger for the third fret. Just like the other songs, start off as slow as possible and over time build up the speed.
Video Demonstration
Next Steps
The above songs might not be that exciting to play, but spending time working on them will help you build important skills and technique. Practice these songs until you can play all of them flawlessly from memory. The longer you spend perfecting these simple songs, the easier it will be to start working on more advanced songs.
Here are some extra tips on how to get more out of the above songs:
- Play along with a metronome and try to keep a steady beat
- Play the songs with your eyes closed
- Call the note names out loud as you play (learning the note names is a valuable skill)


